Difference between revisions of "Netgear NeoTV Prime"
(Swapped top photo with stock image.) |
m (Text replacement - "gtvcom-20" to "exploiteers-20") |
||
| (28 intermediate revisions by 3 users not shown) | |||
| Line 4: | Line 4: | ||
[[Category:Netgear]] | [[Category:Netgear]] | ||
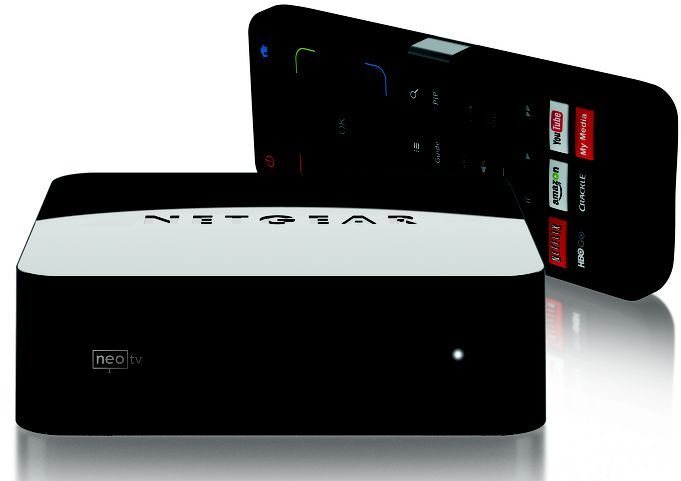
This page will be dedicated to the hardware specifications, descriptions, and information related to the Netgear NeoTV Prime (GTV100). | This page will be dedicated to the hardware specifications, descriptions, and information related to the Netgear NeoTV Prime (GTV100). | ||
== Purchase == | |||
Buying Google TV devices is expensive and, in a lot of cases our testing leads to bricked equipment. If you would like to help support our group, site, and research please use one of the links below to purchase your next Google TV. | |||
[http://www.amazon.com/gp/product/B00AM0ESC4/ref=as_li_ss_tl?ie=UTF8&tag=exploiteers-20&linkCode=as2&camp=1789&creative=390957&creativeASIN=B00AM0ESC4 Purchase the Netgear NeoTV Prime at Amazon] | |||
== Specs == | == Specs == | ||
These specifications are unverified, but based off of the SOC this should hold to be "trueish". | These specifications are unverified, but based off of the SOC this should hold to be "trueish". | ||
We will update this once the hardware ships. | We will update this once the hardware ships. | ||
*Marvell Armada 1500( | *Marvell Armada 1500(88DE3100) 1.2 GHz dual-core processor, with a 750 MHz GPU | ||
*1 GB DDR3 Memory | *1 GB DDR3 Memory | ||
*4 GB Flash NAND | *4 GB Flash NAND | ||
*Single USB Port | *Single USB Port | ||
*IR Blaster | *IR Blaster | ||
== Gallery == | == Gallery == | ||
| Line 21: | Line 23: | ||
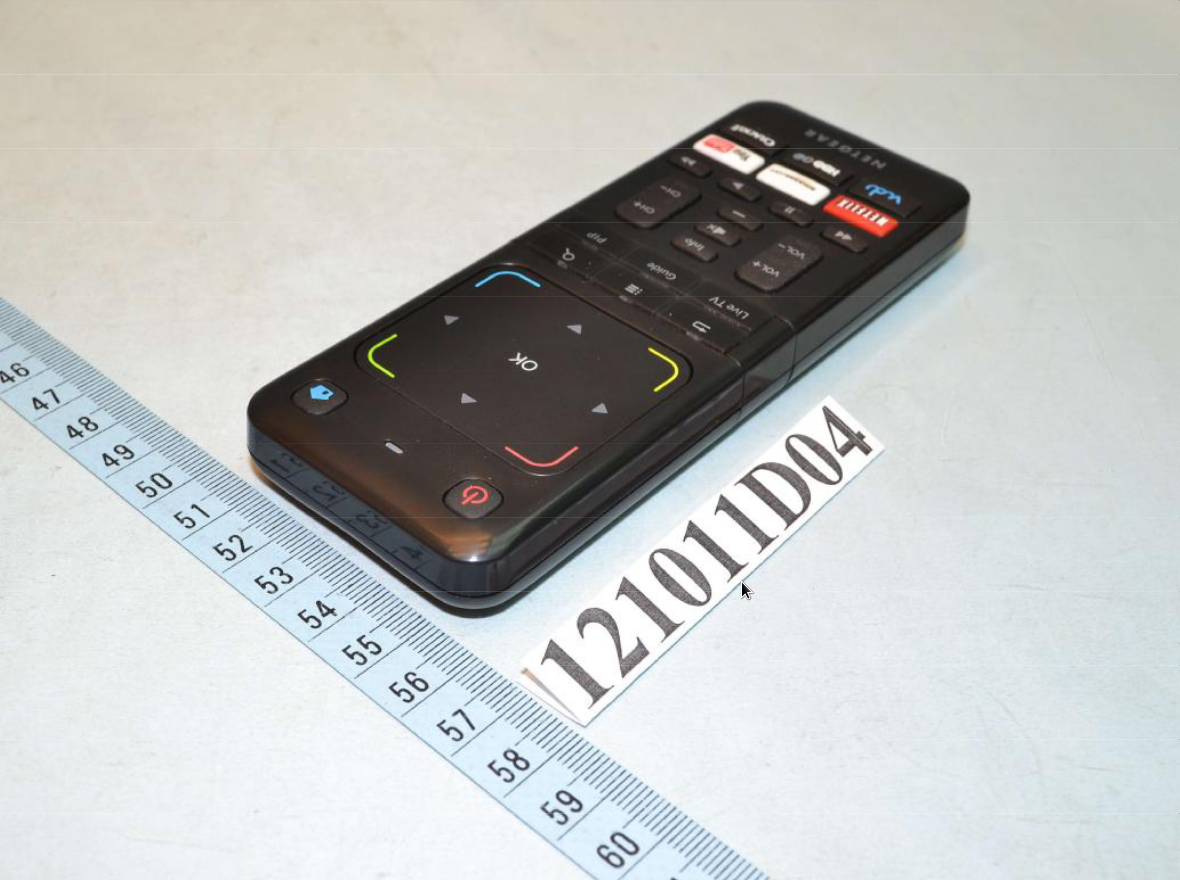
File:Gtv100-remote.png | File:Gtv100-remote.png | ||
File:Gtv100-label.png | File:Gtv100-label.png | ||
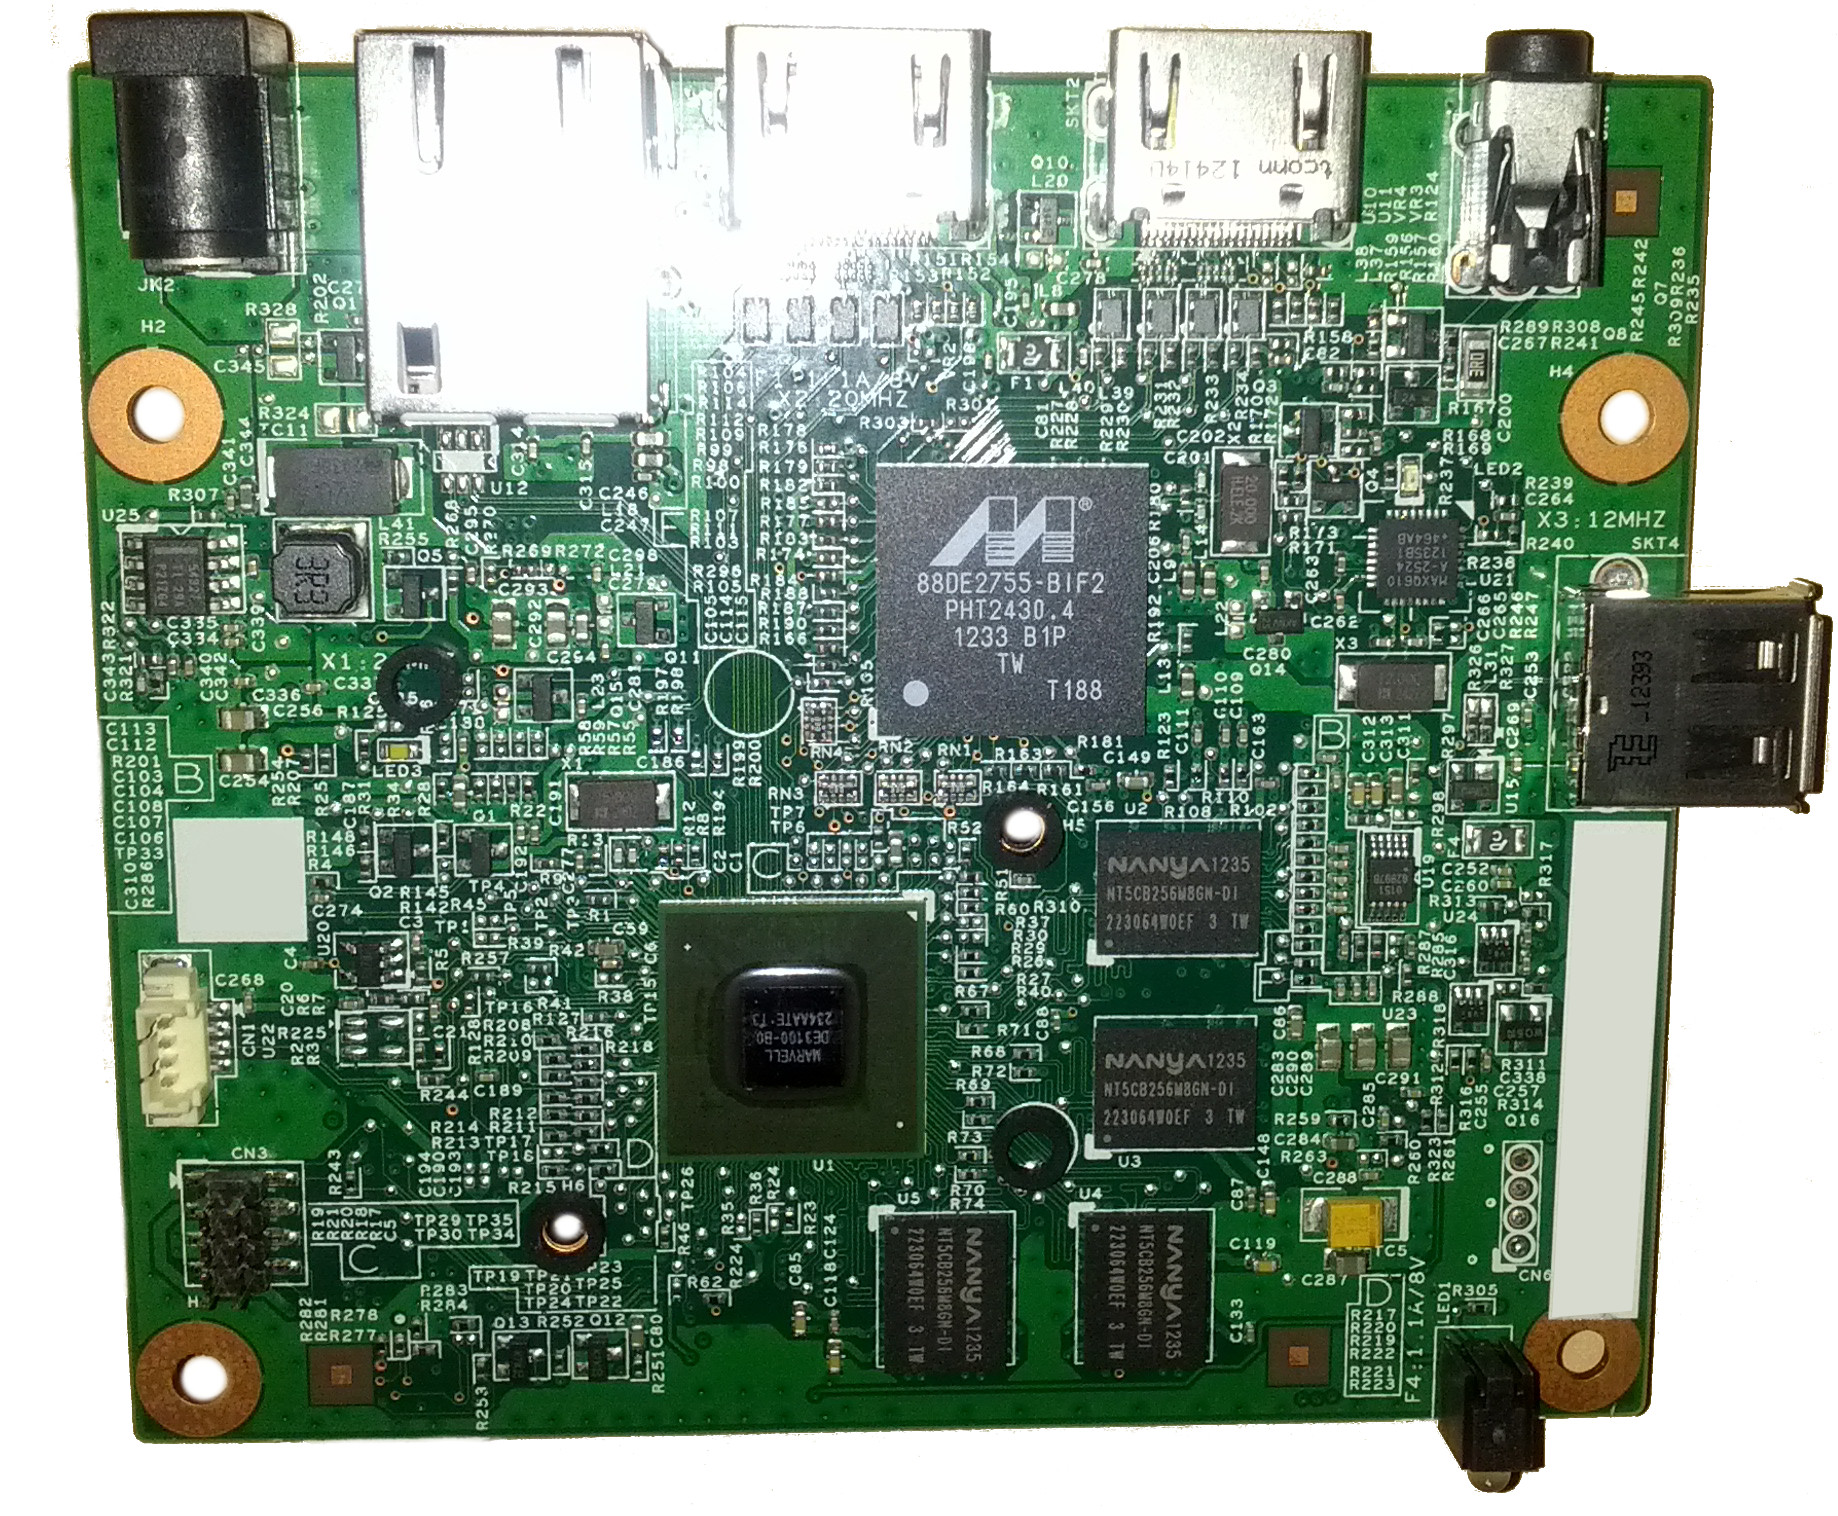
File:Mobo-neotvprime.jpg | |||
</gallery> | </gallery> | ||
== Update History == | |||
*GTV-1.0.3.r0098-SDK1065.HC15848.PV01.09-RC1 - Initial Factory Version | |||
*GTV-1.0.9.r0127-SDK1065.HC15848.PV01.09-PVT_SIGNK - First OTA release, dated Dec 13 2012. Exploits still exist in this version. [http://android.clients.google.com/packages/ota/netgear_gtv100/48a52f02f44a.NeoTVPrime-ota.v1.0.9.zip Download] | |||
== Connections / Connectors / Switches == | == Connections / Connectors / Switches == | ||
*CN1 - UART (115200 8n1) | |||
*CN3 - SPI ? | |||
*CN4 - WiFi/BT | |||
*CN6 - USB? | |||
*SW2 - Factory Restore | |||
== UART Pinout == | |||
The NeoTV features a serial output that can be accessed. In the initial software version, this dropped directly into a root shell. | |||
Using a UART/TTL Adapter (3.3v), connect wire for wire to the pinout below. | |||
Settings are 115200 8n1, no login or password. You will be dropped to a root shell after bootup | |||
{| | |||
|[[File:NeoTV Prime UART.jpg|200px|left|thumb|Netgear NeoTV UART pinout]] | |||
|} | |||
== PrimePwn (Root) == | |||
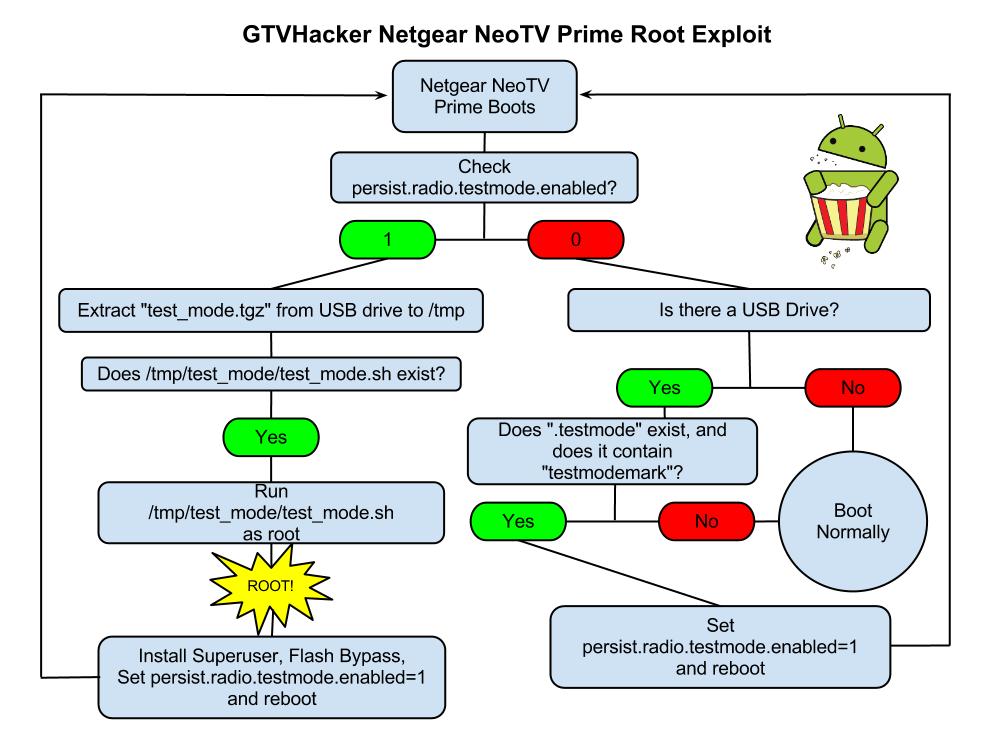
PrimePwn is the name of our automated root process. It works by leveraging a debug service that is called "testmode", which checks for a USB drive with a file named “.testmode” containing the magic string “testmodemark”. The system then checks to see if the file contains the magic string “testmodemark”. If the system finds the file, it sets the “persist.radio.testmode.enabled” property to 1 and reboots. Then, if the device detects this property as 1 upon boot, it attempts to copy and then extract a file named “test_mode.tgz” from the USB drive to /tmp/. After extracting, the system tries to run a sh file named “/tmp/test_mode/test_mode.sh”. Assuming we set the permissions correctly this file will allow us to run the payload of our choosing as root. | |||
[[File:Netgear-NeoTV-Prime-testmode-Root-Process.jpg|500px|center]] | |||
'''The Following are Automatically Performed:''' | |||
Installs SuperSu.apk | |||
Disables automatic updates | |||
Modifies flash plug-in to allow streaming of Hulu and other previously blocked content providers | |||
'''Neo TV "PrimePwn" Root Process:''' | |||
*This process is outdated and should only be used on newly purchased devices which haven't received updates. | |||
# Download [http://download.gtvhacker.com/file/neotv-prime/PrimePwn.zip PrimePwn.zip] | |||
# Extract the PrimePwn.zip to the root of a Fat32 formatted USB drive. (test_mode.tgz, .testmode, README) | |||
# Put the USB drive into your NeoTV Prime and reboot. | |||
# Let the process run, it will reboot a few times and then will end at the home screen. (Approximately 3 minutes later) | |||
# Remove your USB drive. | |||
'''Download:''' [http://download.gtvhacker.com/file/neotv-prime/PrimePwn.zip PrimePwn.zip] | |||
[[Category:Google TV]] | |||
Latest revision as of 01:22, 7 February 2016
"Although the information we release has been verified and shown to work to the best our knowledge, we cant be held accountable for bricked devices or roots gone wrong."
This page will be dedicated to the hardware specifications, descriptions, and information related to the Netgear NeoTV Prime (GTV100).
Purchase
Buying Google TV devices is expensive and, in a lot of cases our testing leads to bricked equipment. If you would like to help support our group, site, and research please use one of the links below to purchase your next Google TV.
Purchase the Netgear NeoTV Prime at Amazon
Specs
These specifications are unverified, but based off of the SOC this should hold to be "trueish". We will update this once the hardware ships.
- Marvell Armada 1500(88DE3100) 1.2 GHz dual-core processor, with a 750 MHz GPU
- 1 GB DDR3 Memory
- 4 GB Flash NAND
- Single USB Port
- IR Blaster
Gallery
Update History
- GTV-1.0.3.r0098-SDK1065.HC15848.PV01.09-RC1 - Initial Factory Version
- GTV-1.0.9.r0127-SDK1065.HC15848.PV01.09-PVT_SIGNK - First OTA release, dated Dec 13 2012. Exploits still exist in this version. Download
Connections / Connectors / Switches
- CN1 - UART (115200 8n1)
- CN3 - SPI ?
- CN4 - WiFi/BT
- CN6 - USB?
- SW2 - Factory Restore
UART Pinout
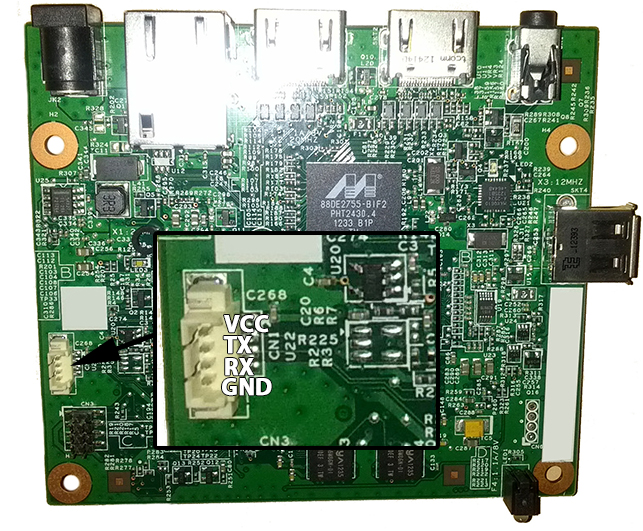
The NeoTV features a serial output that can be accessed. In the initial software version, this dropped directly into a root shell.
Using a UART/TTL Adapter (3.3v), connect wire for wire to the pinout below.
Settings are 115200 8n1, no login or password. You will be dropped to a root shell after bootup
PrimePwn (Root)
PrimePwn is the name of our automated root process. It works by leveraging a debug service that is called "testmode", which checks for a USB drive with a file named “.testmode” containing the magic string “testmodemark”. The system then checks to see if the file contains the magic string “testmodemark”. If the system finds the file, it sets the “persist.radio.testmode.enabled” property to 1 and reboots. Then, if the device detects this property as 1 upon boot, it attempts to copy and then extract a file named “test_mode.tgz” from the USB drive to /tmp/. After extracting, the system tries to run a sh file named “/tmp/test_mode/test_mode.sh”. Assuming we set the permissions correctly this file will allow us to run the payload of our choosing as root.
The Following are Automatically Performed:
   Installs SuperSu.apk
   Disables automatic updates
   Modifies flash plug-in to allow streaming of Hulu and other previously blocked content providers
Neo TV "PrimePwn" Root Process:
- This process is outdated and should only be used on newly purchased devices which haven't received updates.
- Download PrimePwn.zip
- Extract the PrimePwn.zip to the root of a Fat32 formatted USB drive. (test_mode.tgz, .testmode, README)
- Put the USB drive into your NeoTV Prime and reboot.
- Let the process run, it will reboot a few times and then will end at the home screen. (Approximately 3 minutes later)
- Remove your USB drive.
Download: PrimePwn.zip
